Products Information
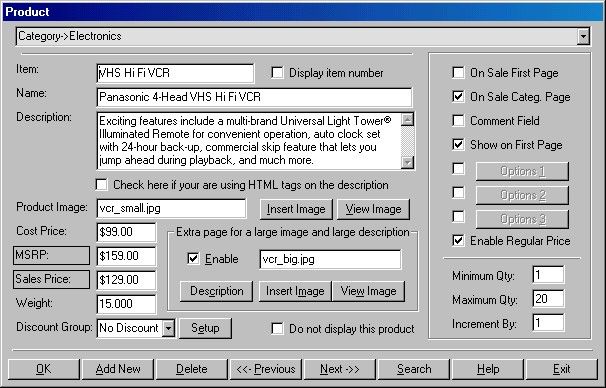
The "Product" screen holds all the information about the product. Here you will enter the item ID, Name, Description, Image, Weight, Price, Location and Options for each product. The first line of the screen shows the location of the product inside the categories tree. How to fill out this screen:
1. Change product category:
You may change the product category by select the drop down menu on the "Categories->..." option and select anew category for your product.
2. Item:
Enter here an technical identification of the product like model number, bar code or any other control number.
3. Do not display this product:
Check this box if you don't want to have this particular product on the web site.
4. Name:
Enter here the name of the product. e.g. "TV - VCR Combo dual tuner".
5. Description:
Enter here a short description of the product. e.g. "TV - VCR 4 heads, dual tuner with 800 x 1200 dots resolution, auto power off, 2 weeks programming system and wide screen". Note: An option to enter a full and detailed description is described below. (10)
6. Check here if you are using HTML tags on the description:
To use this option is required HTML knowledge. When this field is checked, the Shopping Cart System will accept the HTML entered and make it part of the final home page.
7. Product Image:
Here goes the image file name. Use the buttons "Insert Image" to browse the hard disk and find the image of the product. Click "View Image" to see the selected image.
8. Cost Price:
Enter here the cost price of the product. This price is not showed at the home page, it is there just to help you to manage the prices.
9. Regular Price:
Enter here the price before a discount.
10. Sales Price:
Enter here the price after the discount, the final price.
Note: You can change the name of the "Regular Price" and "Sales Price" for any other word like "Special Price", "Your Price", etc...
11. Weight:
Enter here the weight of the product. This field is very import if you select to use freight calculation based on weight. (General Information Screen)
12. Extra Page for a large image and large description:
When this option is enable, an extra link will be placed on the home page for that particular product. This link will show a full and detailed description of the product on a separated page. To create this page, use the buttons on this section: "Description" to enter the full explanation about the product, "Insert Image" to insert a larger image and "View Image" to see how is the picture.
13. Options located on the right side of the screen:
Here you have fill options to check. They are used to show the best sellers or promotional products on the main page or on the first page of the products category.
e.g. Image:
If you check:
* On Sale First Page:
The product will be displayed on the main page in a box with a small picture/link to the detailed description of the product. If you did not create the detailed description as we explained on "Extra Page for a large image and large description" (10), the link you connect to that product category.
* On Sale Category Page:
This option works on the same way as "On Sale First Page". The only difference is that the product will be placed at the first page of that category. * Show on First Page: The product will be place on the main page with the regular size of the picture, description and the button to order the product.
* Comment Field:
This option creates a field on the home page, and the customer can enter customized information. This is very useful for personalized items like, T-shirts, Mugs, Cups and much others. Click here to see an example
* Options 1, 2 and 3:
When enable, you can click the button "Options" and a screen will open to give you a chance to enter unlimited options for the product. It can be used to enter colors, sizes, styles, or any other need for your business. You can select one or all of them, the Shopping Cart System will arrange them for you. The "Option" screen is very easy. Simply enter the options desired, click "Add" to add, "Delete" to remove or "Close" to finish the operation. The display box shows you a list of all of your entry. To delete an option, select the desired option and click "Delete".
14. Enable Regular Price:
If you want to show this particular product with two prices, "Regular Price" and "Sales Price", enable this field or disable if you want to have just the "Sales Price" on the web page.
15. Quantity Control:
Here you can delimit the range of the quantity to be ordered. Normally you will use the default minimum 1, maximum 20 and increment by 1. These options are designed for wholesale companies whom sells in quantity like minimum 100, maximum 1000 and increment by 10.
16. Discount Group:
Select the discount group and click on "Setup" to setup four different discount groups and a quick price change, to increase or decrease products prices. Click here for more details