Upload - FTP Transfer
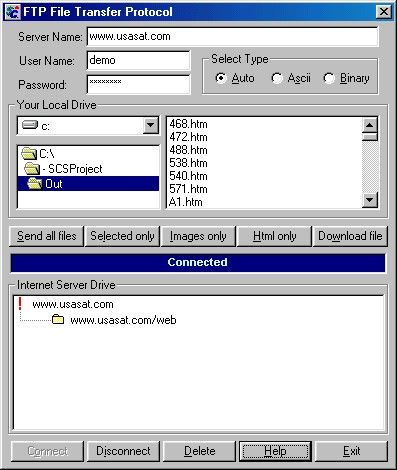
The "FTP File Transfer Protocol" screen holds the information necessary to make a connection with the remote server. On this screen you can see both drivers, (Local) and (Internet Server Driver).
How to fill out this screen:
1. Server Name:
Here goes the company web site name. (www.website.com)
2. User Name:
Enter here the user name used to access the web server driver. If you don't know it, call your web server administrator.
3. Password:
Enter here the password used to access the web server driver.
4. Select Type:
This section gives the user three options to upload files: Auto, Ascii and Binary. It is recommended to use "Auto", so the Shopping Cart System identifies what type of file(s) was select and proceeds with the operation.
5. Your Local Drive:
On this section is possible to browse the local hard drive to find where the files to be uploaded are located. After each generation of the web page, the default directory will be directory created during the installation and subdirectory \\out\\.
6. Internet Server Driver:
On this section is possible to browse the Internet Server drive to find the right directory to upload the files generated by the Shopping Cart System.How operate this screen:
1. When this screen is first showed, all the buttons excepted "Connect", "Help" and "Exit" will be unable. At this moment, the control panel located in the middle of the screen is saying "Disconnected". When the button "Connect" is pressed, the other buttons will be enable and the control panel will say "Connected".
This means that the connection with the server was made successfully and it is possible to upload and download files.
Note: After press "Connect", wait fill seconds until the connection with the server is done.
If an error occur, check the if the web site name is correct, user name and password.
Upload and Download
1.1 Upload:
To make uploads, you have four options:
"Send All Files" button will upload all files of the selected path.
"Selected Only" will upload only the selected files on your local drive.
"Image Only" will upload all the image files ending with jpg and gif.
"Html Only" will upload only html and htm files.
The control panel will show a meter that changes every time a file is uploaded.
1.2 Download:
To make downloads, select one file at the time on the Internet Server Driver and click "Download File".
The control panel will show a meter that changes every time a file is Downloaded.
When you finish, click "Disconnect" and "Close" to exit this screen. The "Delete" button works just with files on the Internet Server Driver.
e.g. Image: